
Repairing Your Cheetah Stand C8 C10 C12: Broken Pole So you’ve been using your Cheetah Light Stands for a few seasons and one day on a job, you lift your Cheetah Stand to auto-collapse the legs and suddenly it splits right in the middle! Fear not, this i
So you’ve been using your Cheetah Light Stands for a few seasons and one day on a job, you lift your Cheetah Stand to auto-collapse the legs and suddenly it splits right in the middle! Fear not, this is not a death sentence for our light stands — they take way more abuse than this. But from time to time, like any mechanical device — your light stand will need a little bit of elbow grease to keep it working. Repairing your Cheetah Stand C8 C10 C12 Broken Pole is easy as taking a photo.
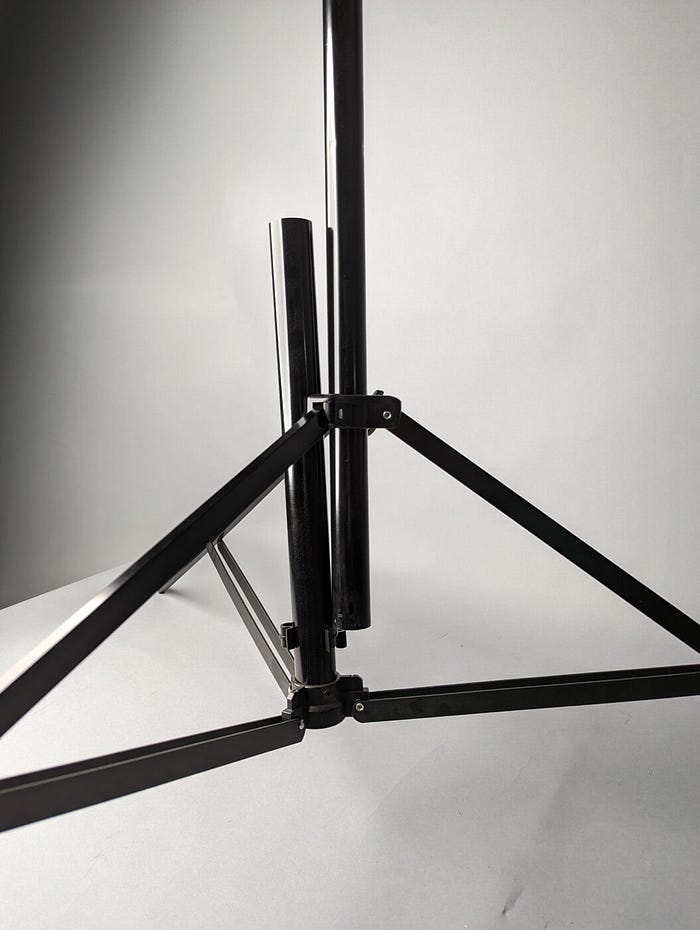
As always, please be aware of the weight you are carrying on your Cheetah Stands and that a gentle landing of the light stand will activate the auto-deploying legs. We’ve found that with multiple hard-landings of our light stands — the locking “O” collars will eventually lose grip and allow the stand to seperate near the legs.
Directions for the locking “O” Collar
The key to repairing your Cheetah Stand C8 C10 C12 Light stand is easy. If the screws have simply backed out, simply re-align the Locking “O” Collar to the marks and tighten down the 2mm recessed Allen screw.
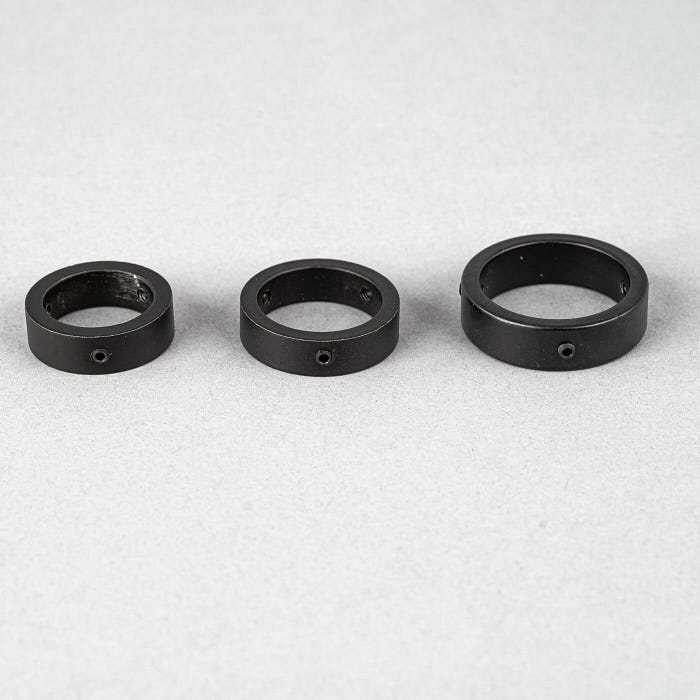
However, if you’ve lost the locking “O” collar, you will need to purchase a new one for your stand. Please note that there will be different sizes based on whether you have a C8, C10 or C12.
Tools Needed:
2mm Allen Wrench
Locking “O” Collar with 3x 2mm recessed Allen screws
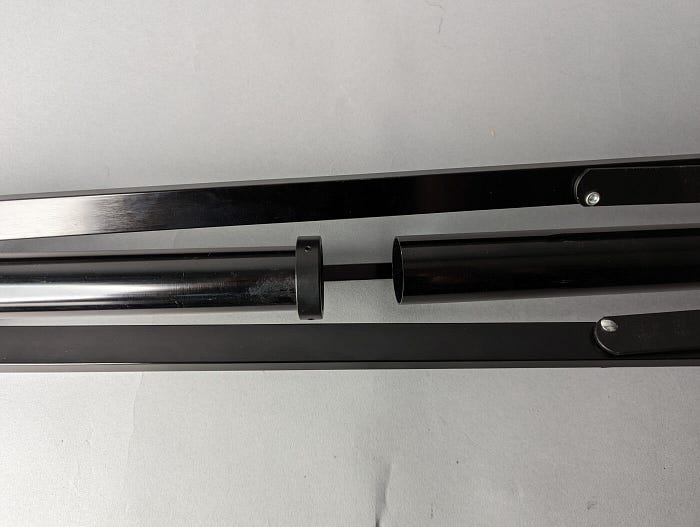
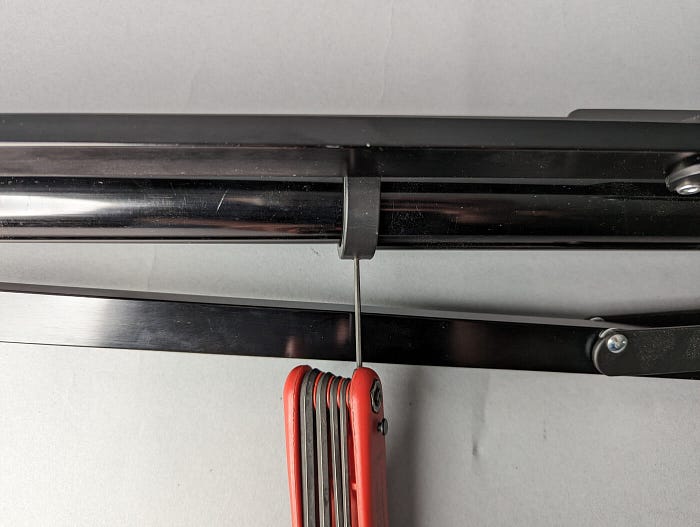
1. Expand the stand and slip the locking “O” collar back thru the open gap and place it at the top portion of the light stand.
2. Push the collar towards the top and look for the screw marks and align the screws to the marks.
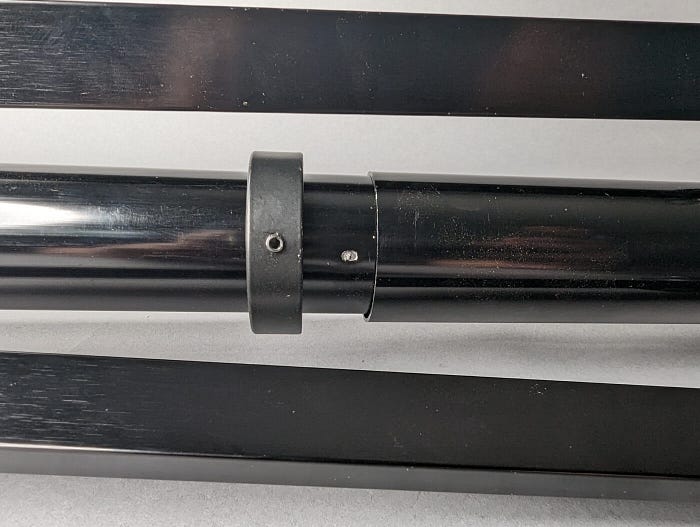
3. Tighten down until the allen wrench is snug. Do not over tighten as you will likely snap the Allen wrench or strip the screw.
That’s it — your Cheetah Light Stand is ready for action again! And as long as you pair the correct weight with the correct light stand and soften the landings to auto-deploy the legs — this should never be a problem again.
As always, if that sounds confusing — just send us an email, repair@cheetahstand.com or give us a call and we’ll walk you thru it!
So you’ve been using your Cheetah Light Stands for a few seasons and one day on a job, you lift your Cheetah Stand to auto-collapse the legs and suddenly it splits right in the middle! Fear not, this is not a death sentence for our light stands — they take way more abuse than this. But from time to time, like any mechanical device — your light stand will need a little bit of elbow grease to keep it working. Repairing your Cheetah Stand C8 C10 C12 Broken Pole is easy as taking a photo.
As always, please be aware of the weight you are carrying on your Cheetah Stands and that a gentle landing of the light stand will activate the auto-deploying legs. We’ve found that with multiple hard-landings of our light stands — the locking “O” collars will eventually lose grip and allow the stand to seperate near the legs.
Directions for the locking “O” Collar
The key to repairing your Cheetah Stand C8 C10 C12 Light stand is easy. If the screws have simply backed out, simply re-align the Locking “O” Collar to the marks and tighten down the 2mm recessed Allen screw.
However, if you’ve lost the locking “O” collar, you will need to purchase a new one for your stand. Please note that there will be different sizes based on whether you have a C8, C10 or C12.
Tools Needed:
2mm Allen Wrench
Locking “O” Collar with 3x 2mm recessed Allen screws
1. Expand the stand and slip the locking “O” collar back thru the open gap and place it at the top portion of the light stand.
2. Push the collar towards the top and look for the screw marks and align the screws to the marks.
3. Tighten down until the allen wrench is snug. Do not over tighten as you will likely snap the Allen wrench or strip the screw.
That’s it — your Cheetah Light Stand is ready for action again! And as long as you pair the correct weight with the correct light stand and soften the landings to auto-deploy the legs — this should never be a problem again.
As always, if that sounds confusing — just send us an email, repair@cheetahstand.com or give us a call and we’ll walk you thru it!